Tuesday, 12 November 2019

CB250 rebuild part 9

**30/3/2019**

This entry is all about the oval holes in the motor and my struggle with them.


**13/4/2019**

It is also about gasket scraping and cleaning. Honda appear to use an adhesive called "shellac" (or something very similar) which sticks the gaskets in place and also leaves behind an incredibly hard/durable brown varnish-y layer that is really difficult to scrape off. The steel plate around the alternator wasn't so bad though.
Thank goodness for power tools.

**23/4/2019**

After a lot of thinking/pondering/outright wonderment I decided that the best course of action was to drill out the existing holes from 10mm to 12mm and then sleeve them down. Some googling revealed I could buy 1mm thick steel cylinders that I could fit into the new enlarged holes:

https://simplybearings.co.uk/shop/Bearings-Wrapped-Steel-Bushes-Plain-Wrapped-Steel-Bushes-Plain-Wrapped-Steel-Bearing-Bushes/c3_4701_4702_4542/index.html

https://simplybearings.co.uk/shop/Bearings-Wrapped-Steel-Bushes-Flanged-Wrapped-Steel-Bushes/c3_4701_4703/index.html

The holes for the dowel pins are already 10mm and are not destroyed (even at the front!) because the dowels are steel and also in the middle so avoided the worst of the movement around the mounting bolts:
While not seeming too bad the holes at the rear of the motor must also be oval, if they weren't then the engine wouldn't be allowed to move about!
However not all the mounting holes have dowels in them, such as the lower front mounting point which is basically destroyed:
It turns out that this hole is 12mm anyway and just has a small/short taper in it which goes down to 8mm - such a tiny contact patch and yet the engine is a stressed member of the frame!? I think if I drill the dowel one first I can then use the front mounting bracket to semi-accurately gauge where to drill through the lower mount. All is not lost.

Full of enthusiasm I purchased 10mm, 11mm and 12mm drill bits from Screwfix (£19.50!!) to ensure they were sharp and straight. The 10mm bit fitted nicely into the new sleeves, which would mean I could line the hole up with the drill until it easily slid up and down and I would know I was drilling in the centre. Once it was lined up I could go up to 11mm and then 12mm as long as everything stayed in place.
Right, let's get to it! The pillar drill is a bit smaller/shonkier than I remembered..
So, knock the sleeve/bush/dowel into the hole for the usual dowel (this was a tight fit):
Check that the drill still fits and the sleeve hasn't been crushed together..
This is where things started to fall apart. The tiny little platform of the tiny little drill was too small to hold the case in a position where I could drill the hole. So I tried to use the base instead which also didn't work.
I tried an alternative setup to try and get the case flat but it was no good.
So I gave it up as a bad job and went back to pondering.

In the middle of May I realised we have a bunch of trained mechanical engineers and a hefty pillar drill at work! I explained to the apprentice (in his late 20s!) what I wanted and that it was of critical importance that he NOT, UNDER ANY CIRCUMSTANCES ruin the holes that the dowels fit into. I could see this wasn't going in. I could see he wasn't listening, and even if he did listen he would never understand. As soon as my back was turned he got the 12mm and, by eye, attacked the rear dowel-hole. The case was immediately scrap. He also then insisted on cleaning it which washed a lot of grit into all the bearings and then left them all dry so they're gone too. The only saving grace is that this was the left case and it is the right case that has the engine number on it. Still a shame though.

I later found out from a much more experienced engineer that the drill is knackered anyway and has a decent wobble on it so the hole was never going to be exact. I'm now mulling over buying another left case and a pillar drill so I can do the work myself, as it should be done - properly and with care. At the time of writing (12/11/19) the frame is sat outside under a cover being engulfed by cobwebs and snail poo while the engine parts are sat in a box. What a waste.

Sunday, 10 November 2019

CB250 rebuild part 8

**16/3/2019**

If you've been following this then you're most probably wondering what I did about the alternator because I haven't mentioned it yet. Fact is I thought I'd be clever and that hopefully it wouldn't need to come off, I really hoped the cam chain would slip past the middle bearing carrier thing on the crank and I could slip on a new one while leaving most of the left case in situ. This didn't work out.
There is no room around the carrier and the stud for the nut at the top of it is always going to be in the way. This was a bit of a downer. So now I had to wrestle with the flywheel bolt and taper while the crank can freely rotate because I can't use a penny in the primary gears to stop it.. First remove the alternator cover:
The chain is driven by the start motor (yuck), here is the sprocket that sits on the end of the motor:
Refitting this to the motor would have been impossible with the alternator cover in place anyway so this all turned out to be not so much of a loss as I thought. So, oil filter chain wrench doodad:
Special clacker at the ready again..
Turn the chain wrench thing around so you can tighten and start with the special flywheel puller tool (bolt).
You might need a little extra help to stop the crank turning. These pistons are dead anyway because I'll be buying new barrels and probably pistons so I had no qualms about this.
After what seemed like sheer brutality (tighten the bolt, hammer, tighten, hammer, tighten, hammer) there was success!
Everything should be easy now. I don't know why the steel plate spacer thing is so rusty though.
The rollers for the starter clutch promptly fell out, except for one which was stuck in place. These will no doubt be a very good game of fun-ness to put back. Also red rust!
Thankfully the flywheel is magnetic so can serve its true purpose of a way to not lose things.
Since I apparently have to remove the crank from the case to fit a new cam chain I had to remove the other piston so that the con rod would fit between the studs. I didn't lose any circlips this time!
Another look at the carrier. Them bob weights are massive ain't they? I actually had to use the clacker to undo the bolts around it, using a normal wrench proved too difficult because I couldn't get the case to stay still.
Remove the bolts (and one nut for some reason) and let Thor do his work..
Thor actually causes me a problem later on from this, it turns out the middle bearing can move around in the carrier and this moves it so that the old chain won't come off. That takes me a while to figure out. Anyway, store the crank somewhere clean. If you can.
And admire the now emptier crank case!
There is a main bearing, a seal and some kind of gasket behind that plate. I don't want to see them if I can help it.

**9/4/2019**

I really wanted to replace the cam chain because "people in the know" know that the chain will be super slack by the time 93K is up. Here's how my original chain (bottom) compares to a brand new chain (top):
Hardly worth bothering with. Perhaps it's the 2000 mile oil changes I religiously do, or perhaps it's because the motor is so mild that the cam merely caresses the valves but this doesn't seem in dire need of replacement to me. Anyway, the trouble I had with the bearing carrier - it was because the stud that the tensioner sits on didn't seem to be far enough away from the crank weight:
But it turned out the carrier with the stud on it actually quite freely moves side to side and must've been dislodged by Thor. Oh how I laughed.

Wednesday, 6 November 2019

CB250 rebuild part 7

**16/2/2019**

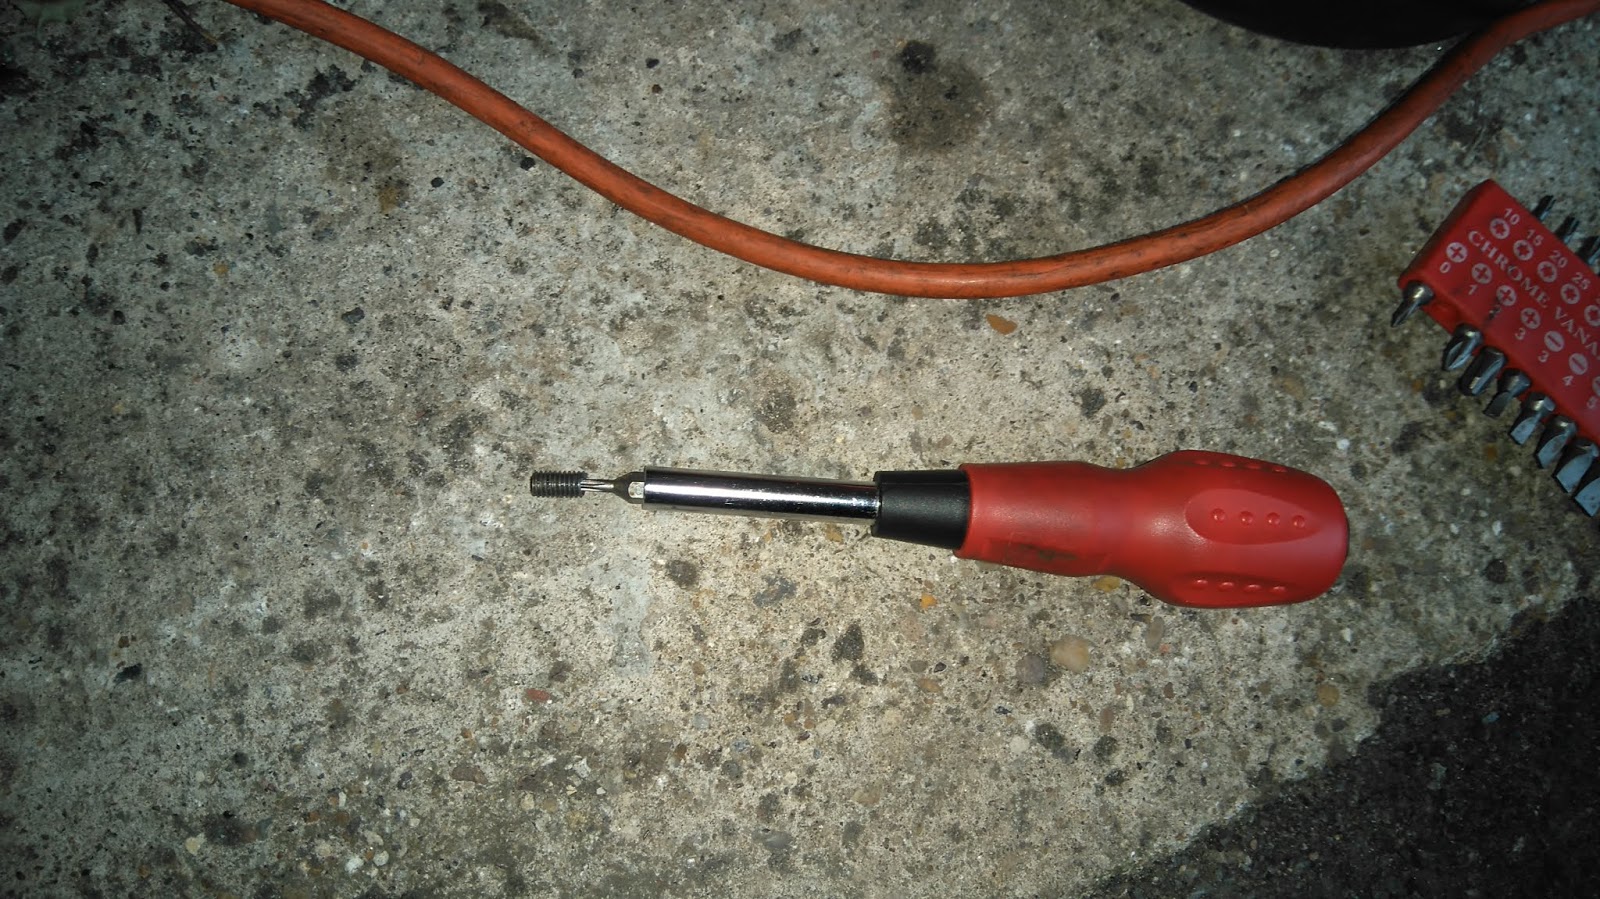
Before going any further I decided the next thing should be to try and extract what was left of the bolt that was supposed to be helping to clamp the head and barrels down but had instead been broken for a long time. Armed with nothing more than a cheap Am-Tech Dremel rip off to make a small dent in the top of the bolt (the supplied drill bits being made of cheese) and then a small Black & Decker drill with a proper bit in it I did actually manage to make a dish in the top of the steel! I was surprised, most convinced that the drill would just slide off and ruin all the aluminium threads surrounding the hard steel..
And maybe it's a better picture with some flash?
The next step was to try and get some extractors to grab the bolt and turn it out, Dad had a cheap set that looked the business:
But they proved to be completely ineffective, nowhere near sharp enough to get a hold of the steel. Plan B!
Torx bits are great. A few taps with the hammer to make it bite and..
Very little effort was needed to unscrew the remains, it was never tight. Again I wonder if the bolt had a manufacturing fault in it right from the start? Anyway, one empty hole!
Is the thread okay though??
It is! Success!! I done did some proper engineering like.

**9/3/2019**

With everything going so well it's time to try and split the cases. I had a go at cleaning them to stop too much gunge getting inside the motor, I think you'll find my efforts were more than acceptable (?)..
I had a go at pulling on the bolts that used to hold the clutch cover on but that just wasn't doing the business.
The bolts go back in this sequence, lest I forget.
That is some spare washing line, part of a plan. This day was windy, which nearly blew the cover off the awaiting frame.. Cor look arrit!
Must fix must fix must fix.. Time to employ the plan. Remove the plunger gubbins from the old scrap clutch cover, thread the washing line through the clutch plunger arm hole and the dipstick hole, bolt the cover back on the engine and then use the washing line to suspend the engine from an engine crane or whatever. Boom, all the weight on one side. Good Lord I'm so clever.
I used a bit of wooden stick and a mallet and set about separating the cases. This took a lot of effort, I don't know how else you would ever do it. I don't need to tell you why you shouldn't jab a screwdriver in between the halves, right?
The starter motor hole also took a good malleting.
At this point the cases seemed to stop separating any further, had I missed something??
It turned out it was just the countershaft bearing being tight in the case, nothing a few choice mallet whacks couldn't sort out.
At this point I realised I had to remove a piston because the big studs in the cases won't go past it, and it's easier (and safer) to unclip a piston than remove those studs.
Annoyingly the circlip pinged away never to be seen again but no time to mourn that now, things are just getting exciting!
One last pull and..
A quick squizz shows the gearbox is probably not falling to bits, no missing teeth or any obvious smashiness to report. Excellent.
Remember where this goes. It comes off the shaft very easily so I'll probably get it wrong later on.
Welcome to the weird bearing carrier thing in the middle of the crank, and the strangest cam chain tensioner I ever done saw.
And also the upper front mount, sporting serious ovality. However it does also show that the dowel pin has not been worn right through, which means that particular bit of housing is still round and the cases will go back together straight if I ever get that far.
Maybe this can all be saved after all, the only truly dead bits found were the heavily scarred bore and the detent arm. In case you even thought to ask, the crank and all of its bearings are perfectly tight. Hmmm.