Here in the UK we live under an authoritarian regime that insists we have every vehicle aged over 3 years old tested by a professional so that we can all be sure that every vehicle on the road is perfectly safe and road worthy. Despite having bikes pass with ruined wheel bearings and wobbly rear sprockets that nearly catch on the inside of the swingarm (!) I was pretty sure that a simple, inconsequential hole in one side of the exhaust would constitute a fail and a recommendation I ride the venerable CB250 to the nearest scrap yard. Something had to be done! And that something had to be cheap, and hopefully easy. Thankfully such a thing exists, but it is almost entirely confined to the car world for some reason. That thing is an exhaust repair bandage..
This is the CB250. As you can see, despite having 87200 miles and 23 years of abuse under its wheels it is still in showroom condition.
But follow the rules we must. More civilised countries such as France have no road worthiness test for two wheelers despite being in the EU and pretending to follow all their rules, but let's not get side tracked. On the underside of the exhaust, near the balance pipe, there is a hole. And this is a problem for the government for some reason.
Okay, when I say hole I mean part of the exhaust has dissolved. But let us not get bogged down in the details! Interestingly you can see the end of the inner pipe that runs down from the head, I guess that is what is rattling about when the exhaust gets hot.
Now I didn't like this as it cost money, £2.49 in fact, but I needed some kind of repair kit. I got one of these. The one from Holt was 50p more, so they can bugger off - CarPlan sounds fine to me.
Step one, wire brush that 'zorst until it's clean.
Sparkling!
This also exposed another hole on the top. A curious development, but no problem as I'll hopefully be wrapping the whole lot anyway.
Closer examination reveals the exhaust is actually about to break around the balance pipe but as long as it isn't blowing when The Man is looking at it I'll get a pass certificate, and that is all that matters. Always play the game.
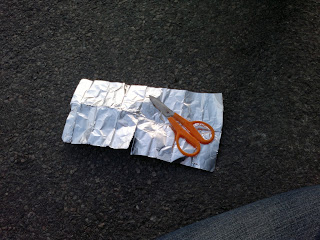
Step two - cut a bit of foil (supplied in the kit) to cover holes and act as a "flame guard" so that the repair wrap doesn't burn or something. Easy enough!
Ah, beautiful. Now, wrestle with the stupid wrap stuff..
Separate both plastic sides from the wrap, the instructions say. The sticky, tacky wrap. Hahaha.. What planet are they on?? Maybe the Holt stuff is easier to use.
The actual instruction is to run the vehicle until the exhaust is warm, separate the black wrap from the blue plastic and wrap it round tightly to repair. There are several problems with this - the exhaust is only hot enough to make the wrap stick by the time it is hot enough to burn you, and it is impossible to wrap it tightly when you're faffing about layering the wrap on and peeling the remaining blue plastic off the other side, while the engine is running to keep the exhaust hot enough.. Ugh. Eventually, after getting really tacky black stuff all over my fingers, I got this:
Then simply tie some wire around it (also supplied, though not enough for two repairs..) so that it doesn't all fall off. Just twist the ends with pliers to tighten.
And lo, the exhaust is factory fresh. Run the vehicle for 20 minutes or go for a gentle drive, say the instructions.. The black stuff melts and then goes hard, but this also makes the wrap go a bit saggy. Mine is still melting after about 50 miles but the "repair" seems to be holding and, most importantly, I have gained an MOT and am allowed to use the bike on UK roads for another year. Thank goodness for that!


No comments:
Post a Comment