At a mere 77359 miles I was happily whizzing along on the K100, thinking it was about time the big single wheel bearing in the final drive was done for, when the bike fair leapt to the side over a long road imperfection. Oh goodness, I exclaimed. Sure enough, once safely at home, I put a hand either side of the rear tyre and it clonked about slightly in a way that was very different from its usual solid self. Here we go!
First step was to consult the Clymer manual. I want to replace part #13..
Oh golly gosh this looks difficult. However, Clymer only show how to perform a full refurbishment of the final drive, not just a quick bearing replacement. There was hope yet! Some searching revealed these sources of information, which my actions are heavily based on:
A link to a "How To" video recorded by CharlieVT on the BMW LT forum
A guide by the great MikeP on the K100 forum
A forum thread with a bit more information from CharlieVT
Feeling relatively well armed with all this information, and particularly encouraged by how easy MikeP makes it look (which is a goddamn lie) I set about my own final drive..
Hello old friend!
Drain the FD oil and check the plug for metal - weirdly mine still looked clean enough.
Remove the wheel and caliper..
Remove the two countersunk screws that hold the disc in. These were tight because someone had rolled them around in the mud or something before putting them in. Yours might be tight due to threadlock, which would be even worse..
And off it pops!
I became intimately familiar with this over the course of my week off from work. Bloody thing. Now, time for the more advanced stuff - I hope you have the right tools available?
If you don't have a kit like this then go get one because working on a K100 is near impossible without proper allen bits. And don't use keys, they chew up the bolt heads. Onwards we go.. Undo all the little bolts around the outside.
One of the most disturbing things about this whole job is that these bolts were loose. I don't know if this is normal, possibly caused by the bearing collapsing and taking the tension off the bolts, or if this has contributed to the demise of the unit. No one on the K100 forum picked up on it - if you are following this and have a go yourself, let me know if your bolts were loose too! Now, grab a rubber mallet (or maybe a leather mallet would be better) and start knocking the "inner" side away from the "outer" - use the brake caliper mounting lugs for this.


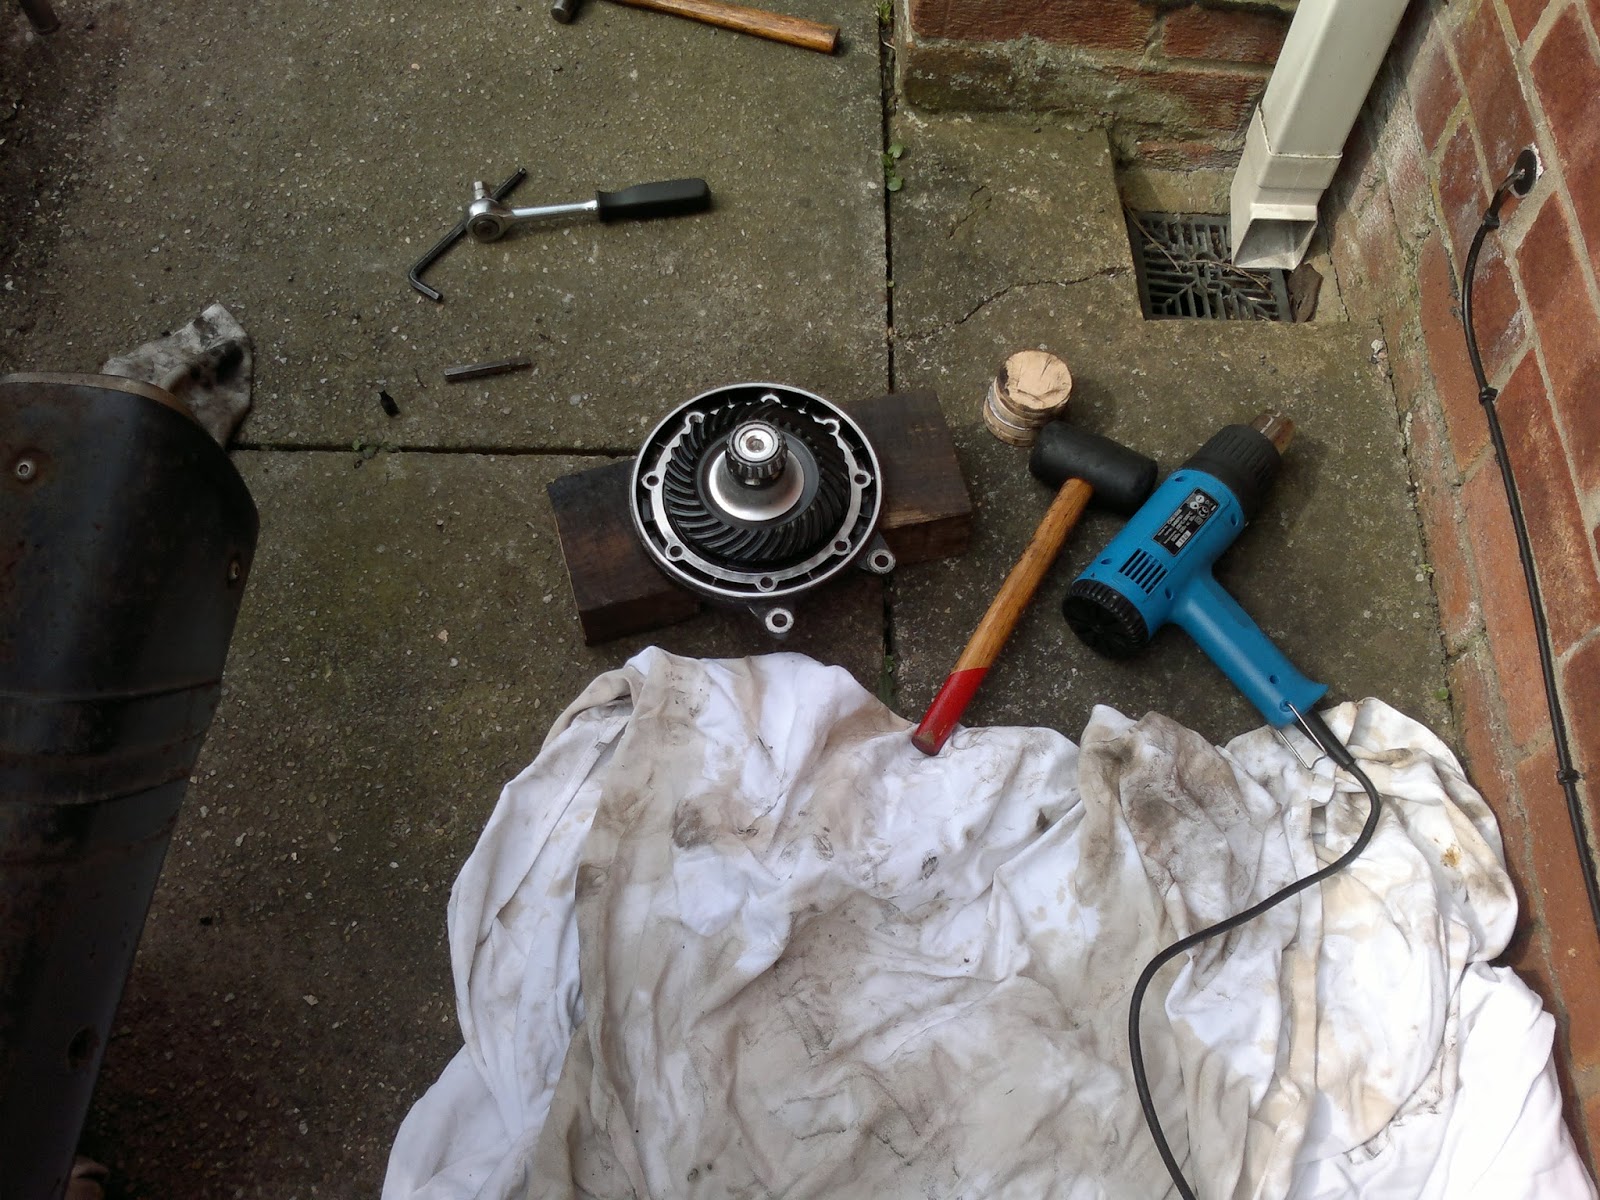
Mine took quite a bit of hammering to get it to crack like this. If you have a heat gun (and you should, because you'll need it a lot for this) you could try heating the "outer" side of the FD case, the bits that is bolted to the swingarm - the "inner" side fits inside, so don't heat that as it will just make it a tighter fit. Be sure to have some rag underneath as not only might you need a soft landing when the "inner" side comes out (it's quite heavy!) but it'll also dribble gear oil everywhere. Soon this will happen, I promise!


Welcome to home mechanic hell. My aluminium FD cases had marks where it looks as if the two halves have been rubbing and swapping metal, again I don't know if this is normal. The crown wheel bearing is underneath the crown wheel (or ring gear as some call it, including Clymer), which is the big dark thing underneath the taper roller. So, turn that bit round, lay down a clean(er) rag, grab your rubber mallet and knock the hub in the centre. It should come out quite easily.
Which leaves you with the casing, including the output seal and the shims (
bloody shims, we'll get to that later)..
..And a crown wheel!
The taper bearing is on the underside, nestled in the rag and hopefully not immediately filled with dirt. That fairly standard deep groove ball bearing is what we're here to replace. Mine felt a bit rough to spin but I couldn't wiggle the races around, I guess it depends how far you go on a worn bearing.
Easy enough so far, innit? A top tip that I'll give you now is to take the rest of the FD unit off the end of the swingarm and have a good, hard look at the input seal (is it leaking? Mine does), the splines on your FD (are there any flats left? Mine is decidedly iffy) and the splines in the shaft (Are there any? How wide are the flats? Mine was okay). I followed some bad advice from the K100 forum and ploughed ahead, intent on just replacing the bearing while disturbing as little as possible but I later discovered that my FD unit is heavily worn in other ways. There are still plenty of them about so, for now, it is likely totally economically viable to replace the whole unit with another less-used one. Think about it. Anyway..
I was so heartened by the fact that this all went so well and quickly that I decided a trip to Moto-Bins was in order, so that I didn't have to wait for the bits to arrive in the post. I'd just lever the bearing off like MikeP says and it'll be done in a day, no probs.
I wondered how Moto-Bins were undercutting Motorworks and James Sherlock, of course the bearing isn't SKF. And of course it's only 17 ball, not 19 ball. Oh well too late now. I also bought a new output seal (exactly the same as original, I'm pleased to report) and a new O ring to go between the case halves as mine looked a bit chewed up.
So, put a couple of wheel bolts in the hub, stick it in the vice and lever it off, just like MikeP says.
Tyre levers and the heat gun for good measure..
This really didn't work. There's so much stuff in the way that I can't get two levers perfectly across from each other, but the bearing also refused to even suggest that it might budge. I also didn't dare to really go for it because the crown wheel, being so hard, might be brittle and if it snaps then the FD is scrap. So I tried hammering some wedges/screwdrivers underneath it instead.
This didn't work either. In fact, the crown wheel is so hard that it started to bite into the surface of the screwdrivers rather than them sliding over it. Bugger!
It became apparent that I would need to attack this differently. CharlieVT uses a three legged puller but nothing comes with claws thin enough to get in the gap between the bearing and the crown wheel, and a cheap £15 jobbie will likely just break if the claws were ground down that thin. It was suggested on the K100 forum that I need a "bearing separator" but to get one in a big enough size to fit the 15cm diameter bearing is an enormous cost. I conceded defeat and looked to the Internet for help. I soon discovered there is a BMW cafe racer place in Leicester called Sinroja, who offer a
final drive refurb service. Sure they're clearly well into their boxers and not bricks but these units are all much of a muchness, so I called them up and was there in an hour on the trusty(ish) CBX for them to "have a look".
Eventually the guys turned up and set to it. I'm afraid I don't have any pictures of this but the guy used an enormous bearing separator
like this and a fly press
a lot like this. After a couple of hits with the press it was clear the bearing was not going anywhere (not just me, then!) so he took a blowtorch to it. After a few minutes of this he gave it a few more presses and thankfully the bearing started to slide off, at first a little and then a lot. Even he seemed surprised at how stubborn it was, I have no idea quite how strong MikeP must have been but I think we can deduce that some crown wheels are made ever so slightly larger than others!
I had taken my new NTN bearing with me in a vague hope that it might all be done at the same time, which turned out to be a good idea as the poor guy then offered to fit it for me. Loads of freeze spray over the crown wheel as it was still hot and the new bearing on the little electric stove, eventually it plopped on just like people say they will. He then even slathered it in grease for me. Then I was given a coffee, talked bikes a little bit and found out he didn't want any cash in return, just a good review on google - glad to help out, he says. These are good guys, they clearly do a lot of work with BMW (including stuff under NDA!) and their workshop is actually very impressive. I hope you may find someone as amenable to get your bearing off if you cannot lever it off yourself.
One thing that did strike me is that this guy was quite sure I would need to re-shim the final drive now that it had a new bearing fitted. I tried to tell myself that this is just because he is used to boxers and that the fine K community must surely be right that shimming is not required, but everything he said made sense. I was about to find out that he was correct.
***THIS IS NOT REALLY PART OF THE GUIDE, THIS IS ME FAFFING ABOUT AFTER LISTENING TO THE WRONG PEOPLE***
Safe in the knowledge that re-shimming is only required for some boxers that were improperly shimmed from the factory I rushed home and set about slapping the unit back together. Installation is the reverse of removal, after all.
First was to knock the old oil seal out of the casing. Two things about this, one is that I probably wouldn't bother again because the seal still seemed perfectly fine and the other is that I would not install the new seal until right at the end, but I was eager. So, with some blocks of wood to hold the casing in the air, use a drift and a hammer to knock the seal out:
And simply push the new seal in with your thumbs. If you greased it all up then it will go in, no worries. Then use your heat gun on the casing to expand it, and plop it over the crown wheel. I later took to doing this the other way up, plopping the crown wheel into the casing - it seems to work better that way.
With that done, it all goes back together. A cinch!
Easy innit? Except I still had play at the rear wheel, not quite as much as before but it was definitely there. I was sure it used to be absolutely solid, hmmm. Turn the wheel a few times and it kind of went away but that's likely just the cushioning effect of all the oil and grease that is in there. Right, maybe it is shims. Here we go..
***BACK TO THE GUIDE***
Exactly as shown by CharlieVT in his video (and not mentioned at all by MikeP!) I used the "Dman" method to measure how much shim I needed. I was lucky in that my FD was now under-shimmed, so I knew something was up because the wheel still wobbled about. If it had been over-shimmed I wouldn't have known and early failure may have occurred because of the excessive force on the internals. Although, I'm not quite sure if that is the case as you only tighten the casing bolts to 20Nm so maybe the force you can put through the internals is limited. Depends if the case halves really touch together or not, I don't know if they do. Anyway, this happened.

To do this I put the unit back together quite dry, no grease between the shims and the case or the bearing and just a touch of gear oil around the bearing to help it slide. You don't want anything in there to act as a cushion because that will give you a false reading. I left the shims in because I knew they were under but if you are coming at this blind I would suggest leaving them out for this, you may have too much already. I used a couple of the wheel bolts with their collars turned upside down to give a nice level surface for the tyre levers to lever upwards and a small hammer to knock the crown wheel and bearing back downwards. I feel bad about this but you don't need to give it any welly, just a few taps. I found that the bearing is actually not a tight fit in the case and slides up and down quite easily once it is in there and totally straight with the machined innards of the case, just resting on the levers could bring it upwards so there is no need to keep the case hot and expanded - at least, not with mine!
Once I discovered that the shock mounting bolt/stud thing (mine is corroded into a bolt with the nut) could be used to steady the unit and stop if flopping all over the place when I was working the levers then I found it was quite easy to get repeatable readings. I was getting 0.12 and 0.13mm difference on the dial gauge most of the time, sometimes more and sometimes less but I put that down to the whole lot moving about on the ground. BMW specify 0.05 to 0.1mm extra shim for preload on the taper bearing which means I need an extra 0.17 to 0.23mm of shim in there - a 0.20mm shim was duly purchased from
James Sherlock who seem to be the only people who sell all different thicknesses of shim. This was a painful £15 but I guess that is cheaper than buying new bearings at £45 a pop.
I mentioned earlier that it may be best to check out your whole FD unit before deciding which course of action to take. Since the unit has to be taken off the bike to check for the required shim thickness I had a look at my FD splines for the first time in around 5000 miles, and they looked bad.
I think this has been caused by the leaky input seal letting gear oil get in and wash the moly away, and also too many miles done on soft shocks that let the rear of the bike move up and down a lot - this slides the shaft over these splines, massively increasing the wear rate. I don't think this was really worth fixing, there are some nice looking FDs about for under £120 or so and I have already spent £80 by this point - you will have spent more if you have to pay someone to get the bearing off for you.
After a couple of days the new shim arrived, and only a bit bent.
Oh good, lucky me, I get to take that final drive to bits and then put it back together again.
Time to put the unit back on the swingarm, otherwise it is impossible to undo any bolts and the whole lot moves about on the floor. Moly time!
Take the bolts out..
Heat gun the casing until the crown wheel falls out. You know the drill by now, come on. All this heating is why you probably should wait until final assembly to put the output seal into place, and it may help with your "Dman" shim measuring too. Thankfully my seal didn't seem to mind being heated to what probably was 100+ centigrade at times.
In the interest of science I took the old shims out to measure them. I found one was a bit bent, compounding my theory that this had all been done before quite badly.
I also found it amusing that my new shim, top left, clearly wasn't the original BMW part I had assumed I would be getting for my £15. I should've expected that.
Here we go again, back at it with the heat gun..
And in it plops, maybe with a little push downwards for good luck/peace of mind. And with the shims underneath, don't forget that bit!
I'm sure you can figure out the rest. Put it all together, grease the pinion-side case well around the outside so that the crown wheel half will fit into it without too much of a fight, rubber mallet it into place, rubber mallet it round until the bolt holes line up, do the bolts up to 20Nm, put the disc on with the screw done up to 15Nm (my choice, seems enough), put the wheel on and check it for play. Mine was now solid, hopefully yours will be too. Fill with oil, churn it around some more, still solid? Of course it is because you've re-shimmed it like a pro. Take it for a spin, come back after a few miles, still solid? Mine was. I'm happy with this.

A quick check of the temperature of the FD unit showed it to be warm but not hot, and no whining was observed despite having changed how the crown wheel and pinion gears mesh because I have shoved the crown wheel an extra 0.2mm into the pinion gears. If anything this has reduced the lash in the final drive, which is a nice thing. I couldn't tell you if that is technically a good thing or not.
I changed the oil again soon after to try and flush out any nonsense that will have inevitably found its way inside, I suggest you do the same. And that's that. One last thing to mention is that, upon reassembly with the extra shim, the FD was stiffer to turn than before the shim but I cannot put any hard figures on that so it doesn't really help anyone. But it is a true phenomenon, if you can easily shove the hub round with one finger on a bolt then it's probably a bit too loose but needing two fingers would be too tight. Maybe that will make sense to someone somewhere.