With the death of the Bridgestone TW202 and the tube that was in it (thanks, nails) I was in need of a 120/90-16 rear tyre, preferably tubeless. A quick look at Oponeo showed a possible solution from GoldenTyre, and a bit of reading showed people seemed to like them. Some people even race supermotos on them, though I did find someone saying the guys on these tyres slide around a lot more than those using Michelins. This is probably correct.. But I had to find out for myself. Bam!
The tyre man who I get to fit these must think I'm mental.
Initial impressions were good, the tread depth was massive, the releasing compound did not make itself known (take note of this, Bridgestone!) and having a nice round tyre was a great relief after the very squared Trailwing. It was immediately apparent that this tyre does not offer the same levels of grip and security as the TW202, but the compound is much harder so hopefully longevity will be better than ~4500 miles. The carcass is also stiffer in the middle but wobblier in the sidewall, which is the wrong way round - it has quite a harsh ride but also allows slight wobbling/wallowing when cornering hard. Overall this struck me as a cheap oriental tyre, except these aren't cheap at all at £52 - This tyre was more expensive than another Metzeler ME77 and a lot more than a Sava MC7 which I also intend to test at some point.
As the GT201 was fitted in December I had plenty of opportunities to try it in cold and wet conditions, and I can report that it doesn't like either! Temperatures below 10C or so make the compound become very hard and the tyre doesn't feel all that secure even in the dry, while in the wet it squirms slightly though it is better in warm rain than cold rain. It never let go or gave me a full slide but it doesn't track like it's on rails, which the TW202 really did manage.
I trundled onwards, including a trip to Scotland, and after around 6000 miles it became squared off which leads to a slightly queasy feeling round corners and coupled with the floppy sidewall it is distinctly knocked off line by road imperfections, especially strange cambers. The CB250 is usually not affected by these in the slightest, the GT201 letting the side down somewhat.
As the miles passed by (including a camping trip to Wales with some strange people from reddit) the squaring and queasiness got worse, with the lack of grip in the cold being so disconcerting that it wasn't unknown for me to feel the need to stop and see if it was going flat. I soldiered on though, until at 8066 miles the GT201 was finally punctured by a small nail.
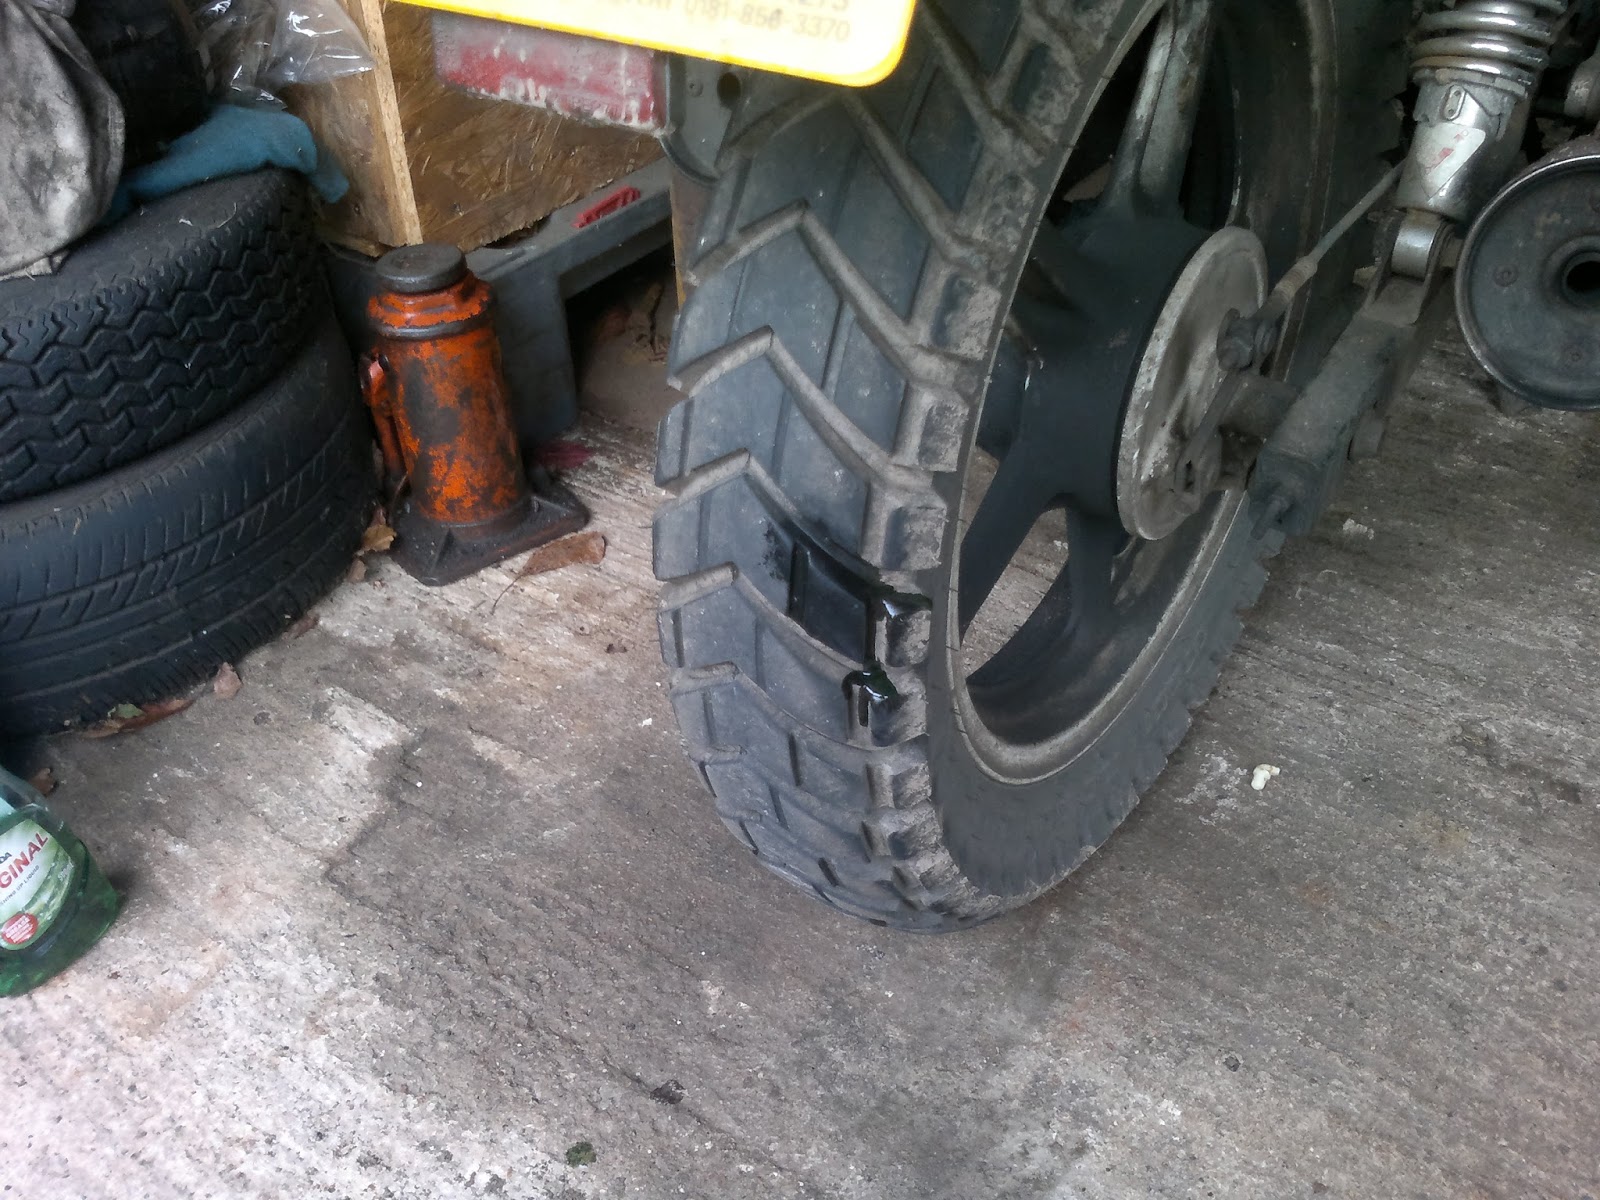
I was disinclined to take it to a proper tyre place for a plug because it was close to the first set of wear markers and it's also a right pain to remove and refit the rear wheel on a chain driven bike, so I plugged it myself with a mushoom plugger thing. As you can see, there isn't a lot of tread depth left in the centre but I shall carry on so I can give all you anonymous Internet types the best review I can muster.
..Not a lot of tread depth, says I. Something strange happened from that point, the GT201 became so square that more tyre was in contact with the road and it seemed to resist all wear. At a frankly ridiculous 12801 miles it sailed through an MOT (the UK road worthiness test) and with 13574 miles under its blocks I think part of it has finally hit the 1mm minimum tread depth required by UK law, right in the centre of the tyre (of course).
Also, of course, the other side of the tyre has loads of meat left on it because the tyre has not been perfectly central in the mould..
So I still feel like there is more work to do. Of course grip has continued to deteriorate and it follows road imperfections in a most alarming way, but I shall continue to soldier on in the name of science.
And so, eventually, after 14691 miles(!) I changed the tyre. Not because it was worn out, it looked basically the same as the last picture, but because I was about to set off on a big trip round Europe and wasn't sure if the GT was going to make it. Here are the final moments of the GT201:
I actually believe there was another 2000, maybe even 3000 miles in this tyre as it seemed to have basically stopped wearing, but sometimes the circumstances come against properly testing something to destruction. So, to sum up, a rubbish tyre with poor grip in wet or cold conditions, and feels wobbly all the time. But very long lived.
I have replaced the GT201 with a Cheng Shin C907 after reading on that there Internet that the 'Shin had upped their game and their tyres were now much better than before. I was looking forward to going back to a road tyre. Sadly it seems to be worse than the GT in every way, and shorter lived.. Maybe the GT201 ain't such a bad tyre after all!
Monday, 25 September 2017
Tuesday, 11 July 2017
Fitting a Givi Monokey top box to a normal rack
Way back in February 2015 someone stole the CB250, and part of the damage incurred was that the old top box was smashed in. A mere 2.5 years later I finally got around to replacing it as some bloke was selling a decent looking Givi box on gumtree for £20. I don't like spending money but even I could not resist the temptation. First though I had to get it home!
As you can see, it also came with the mounting equipment for some version of VFR800. This sounded like a nice extra that I could perhaps sell on to cover some of this initial outlay, but it actually just made getting the thing home more awkward. Still, the police appeared and followed me for a while without pulling me over so it can't have been that bad!
Soon it was home, and soon it was in bits.
Almost immediately I found a problem. Of course this was never going to be as easy as bolt it on..
What a stupid design! I understand that it is to hide the mounting bolts for the arms but it's still stupid. Seems the side bits are not structurally important, let the games begin.
[Much cutting and sawing]
Ha! Now, where are those mounting thingers that came with a DR125 Krauser top box mounting kit a few years ago.. Aha. I knew I'd need them!
Easy innit?
As you can see, it also came with the mounting equipment for some version of VFR800. This sounded like a nice extra that I could perhaps sell on to cover some of this initial outlay, but it actually just made getting the thing home more awkward. Still, the police appeared and followed me for a while without pulling me over so it can't have been that bad!
Soon it was home, and soon it was in bits.
Almost immediately I found a problem. Of course this was never going to be as easy as bolt it on..
What a stupid design! I understand that it is to hide the mounting bolts for the arms but it's still stupid. Seems the side bits are not structurally important, let the games begin.
[Much cutting and sawing]
Ha! Now, where are those mounting thingers that came with a DR125 Krauser top box mounting kit a few years ago.. Aha. I knew I'd need them!
Easy innit?
Friday, 23 June 2017
How to perform a super professional exhaust repair
Here in the UK we live under an authoritarian regime that insists we have every vehicle aged over 3 years old tested by a professional so that we can all be sure that every vehicle on the road is perfectly safe and road worthy. Despite having bikes pass with ruined wheel bearings and wobbly rear sprockets that nearly catch on the inside of the swingarm (!) I was pretty sure that a simple, inconsequential hole in one side of the exhaust would constitute a fail and a recommendation I ride the venerable CB250 to the nearest scrap yard. Something had to be done! And that something had to be cheap, and hopefully easy. Thankfully such a thing exists, but it is almost entirely confined to the car world for some reason. That thing is an exhaust repair bandage..
This is the CB250. As you can see, despite having 87200 miles and 23 years of abuse under its wheels it is still in showroom condition.
But follow the rules we must. More civilised countries such as France have no road worthiness test for two wheelers despite being in the EU and pretending to follow all their rules, but let's not get side tracked. On the underside of the exhaust, near the balance pipe, there is a hole. And this is a problem for the government for some reason.
Okay, when I say hole I mean part of the exhaust has dissolved. But let us not get bogged down in the details! Interestingly you can see the end of the inner pipe that runs down from the head, I guess that is what is rattling about when the exhaust gets hot.
Now I didn't like this as it cost money, £2.49 in fact, but I needed some kind of repair kit. I got one of these. The one from Holt was 50p more, so they can bugger off - CarPlan sounds fine to me.
Step one, wire brush that 'zorst until it's clean.
Sparkling!
This also exposed another hole on the top. A curious development, but no problem as I'll hopefully be wrapping the whole lot anyway.
Closer examination reveals the exhaust is actually about to break around the balance pipe but as long as it isn't blowing when The Man is looking at it I'll get a pass certificate, and that is all that matters. Always play the game.
Step two - cut a bit of foil (supplied in the kit) to cover holes and act as a "flame guard" so that the repair wrap doesn't burn or something. Easy enough!
Ah, beautiful. Now, wrestle with the stupid wrap stuff..
Separate both plastic sides from the wrap, the instructions say. The sticky, tacky wrap. Hahaha.. What planet are they on?? Maybe the Holt stuff is easier to use.
The actual instruction is to run the vehicle until the exhaust is warm, separate the black wrap from the blue plastic and wrap it round tightly to repair. There are several problems with this - the exhaust is only hot enough to make the wrap stick by the time it is hot enough to burn you, and it is impossible to wrap it tightly when you're faffing about layering the wrap on and peeling the remaining blue plastic off the other side, while the engine is running to keep the exhaust hot enough.. Ugh. Eventually, after getting really tacky black stuff all over my fingers, I got this:
Then simply tie some wire around it (also supplied, though not enough for two repairs..) so that it doesn't all fall off. Just twist the ends with pliers to tighten.
And lo, the exhaust is factory fresh. Run the vehicle for 20 minutes or go for a gentle drive, say the instructions.. The black stuff melts and then goes hard, but this also makes the wrap go a bit saggy. Mine is still melting after about 50 miles but the "repair" seems to be holding and, most importantly, I have gained an MOT and am allowed to use the bike on UK roads for another year. Thank goodness for that!
This is the CB250. As you can see, despite having 87200 miles and 23 years of abuse under its wheels it is still in showroom condition.
But follow the rules we must. More civilised countries such as France have no road worthiness test for two wheelers despite being in the EU and pretending to follow all their rules, but let's not get side tracked. On the underside of the exhaust, near the balance pipe, there is a hole. And this is a problem for the government for some reason.
Okay, when I say hole I mean part of the exhaust has dissolved. But let us not get bogged down in the details! Interestingly you can see the end of the inner pipe that runs down from the head, I guess that is what is rattling about when the exhaust gets hot.
Now I didn't like this as it cost money, £2.49 in fact, but I needed some kind of repair kit. I got one of these. The one from Holt was 50p more, so they can bugger off - CarPlan sounds fine to me.
Step one, wire brush that 'zorst until it's clean.
Sparkling!
This also exposed another hole on the top. A curious development, but no problem as I'll hopefully be wrapping the whole lot anyway.
Closer examination reveals the exhaust is actually about to break around the balance pipe but as long as it isn't blowing when The Man is looking at it I'll get a pass certificate, and that is all that matters. Always play the game.
Step two - cut a bit of foil (supplied in the kit) to cover holes and act as a "flame guard" so that the repair wrap doesn't burn or something. Easy enough!
Ah, beautiful. Now, wrestle with the stupid wrap stuff..
Separate both plastic sides from the wrap, the instructions say. The sticky, tacky wrap. Hahaha.. What planet are they on?? Maybe the Holt stuff is easier to use.
The actual instruction is to run the vehicle until the exhaust is warm, separate the black wrap from the blue plastic and wrap it round tightly to repair. There are several problems with this - the exhaust is only hot enough to make the wrap stick by the time it is hot enough to burn you, and it is impossible to wrap it tightly when you're faffing about layering the wrap on and peeling the remaining blue plastic off the other side, while the engine is running to keep the exhaust hot enough.. Ugh. Eventually, after getting really tacky black stuff all over my fingers, I got this:
Then simply tie some wire around it (also supplied, though not enough for two repairs..) so that it doesn't all fall off. Just twist the ends with pliers to tighten.
And lo, the exhaust is factory fresh. Run the vehicle for 20 minutes or go for a gentle drive, say the instructions.. The black stuff melts and then goes hard, but this also makes the wrap go a bit saggy. Mine is still melting after about 50 miles but the "repair" seems to be holding and, most importantly, I have gained an MOT and am allowed to use the bike on UK roads for another year. Thank goodness for that!
Sunday, 11 June 2017
CB250 Two Fifty chain and sprocket change
During my razz around Cornwall in April 2017 I found the chain to be stretching at a most alarming rate. Finally, with 40649 miles under its rollers (!) the trusty DID VM that I fitted way back in November 2011 had stretched to the point where there was no more adjustment left on the chain adjusters and it was still slack. It was so worn that the links didn't really fit the holes in the sprockets any more, there was too much length between each one! So worn, in fact, that I could almost pull the chain around the teeth of the rear sprocket.. Something had to be done. At the same time both front and rear sprockets were hooked and the cush rubbers in the rear wheel had long since given up on the idea of being useful, while the rear wheel bearings were so stiff I could barely turn them by hand - work was required. The saga of the cush rubbers is in the post previous to this, and what a joy that was. Anyway, the first step is actually kind of fun - find the rivet link in the chain (this will hopefully be a little softer than the rest), arm yourself with an angle grinder and grind the ends off the links.
This really wasn't enough. More grinding required!
The only real test of chain wear is to bend it sideways. This shows how much the links have elongated their holes in the plates. Here is the old VM, she did me proud..
That's really very bad. For comparison here is the new chain:
Quite a difference!
I am always interested in trying new brands, and saving money, so after much deliberation I ended up buying a kit from an ebay seller based in Germany - I would get a 104 link X ring chain from XAM, who seem a popular make in Germany and Australia and are of Japanese manufacture so should be good, and sprockets from a selection of manufacturers - you get whatever they have in stock. I got lucky and unlucky in that they supplied an AFAM front sprocket (yuck) and an Esjot rear (interesting!).
Annoyingly they supplied the wrong rear sprocket, Esjot part number 50-32013-31 (JT part 279.31) which is the part for a CMX250C - I need Esjot part 50-32032-31 (JT part 272.31). The two are close, but the base thickness/offset is different. This made it really hard to fit, and I had to use an old washer underneath the new Esjot to make it sit in the correct position. No good sending it back to Germany of course, the postage would be horrendous. Bugger!
The more shallow base also made doing up the nuts harder as the peg things kept spinning round, I found it best to lever the whole lot away from the sprocket with a small screwdriver while twirling a ratchet around on the nut. I should've just bought my own bits separately of course, never trust anyone to provide the right parts if they don't specify part numbers.. Live and learn. And learn. And learn again.. This also means the peg stud things poke out quite a way from the sprocket, almost grazing the swingarm, and aren't as far in to the cush rubbers as they should be. There is nothing good about this situation at all, other than it all fits nice and snug.
Soon enough, it was all together.
The rivet link is right where the Scottoiler tubes are. Riveting a chain is quite a game and a very messy business, the sooner chains go away the better!
Ta da! I must admit I'm also dubious on the merits of painting a sprocket, such as Esjot seem to do - surely the paint will just wear away and cover everything? Never mind, I'm sure they know what they're doing..
This really wasn't enough. More grinding required!
The only real test of chain wear is to bend it sideways. This shows how much the links have elongated their holes in the plates. Here is the old VM, she did me proud..
That's really very bad. For comparison here is the new chain:
Quite a difference!
I am always interested in trying new brands, and saving money, so after much deliberation I ended up buying a kit from an ebay seller based in Germany - I would get a 104 link X ring chain from XAM, who seem a popular make in Germany and Australia and are of Japanese manufacture so should be good, and sprockets from a selection of manufacturers - you get whatever they have in stock. I got lucky and unlucky in that they supplied an AFAM front sprocket (yuck) and an Esjot rear (interesting!).
Annoyingly they supplied the wrong rear sprocket, Esjot part number 50-32013-31 (JT part 279.31) which is the part for a CMX250C - I need Esjot part 50-32032-31 (JT part 272.31). The two are close, but the base thickness/offset is different. This made it really hard to fit, and I had to use an old washer underneath the new Esjot to make it sit in the correct position. No good sending it back to Germany of course, the postage would be horrendous. Bugger!
The more shallow base also made doing up the nuts harder as the peg things kept spinning round, I found it best to lever the whole lot away from the sprocket with a small screwdriver while twirling a ratchet around on the nut. I should've just bought my own bits separately of course, never trust anyone to provide the right parts if they don't specify part numbers.. Live and learn. And learn. And learn again.. This also means the peg stud things poke out quite a way from the sprocket, almost grazing the swingarm, and aren't as far in to the cush rubbers as they should be. There is nothing good about this situation at all, other than it all fits nice and snug.
Soon enough, it was all together.
The rivet link is right where the Scottoiler tubes are. Riveting a chain is quite a game and a very messy business, the sooner chains go away the better!
Ta da! I must admit I'm also dubious on the merits of painting a sprocket, such as Esjot seem to do - surely the paint will just wear away and cover everything? Never mind, I'm sure they know what they're doing..
Subscribe to:
Posts (Atom)


